In previous post I described how to create a Linux Virtual Machine(VM) and connect to it through WindSCP on Windows 10 under a company proxy. However, it is not a best practice from security perspective. One of the best practices is to create a VM with private IP that comes from a dedicated Virtual Network (VNet). The VNet can be in the same Resource Group as the VM, but it can also be from different Resource Groups and even different Subscriptions. This post describes how to create a Linux VM with a Private IP in a VNet that comes from a different Subscription.
 Picture comes from (https://unsplash.com/@timmossholder)
Create SSH Key Pairs
SSH keys are going to be used for security connection to the Azure VM. You can run the following command in PowerShell or the Cloud Shell to generate the SSH Key Pairs. Feel free to change the capitalized USERANME in the command, I always keep it the same to the username I will use in the VM that is going to be created next.
ssh-keygen -t rsa -b 4096 -C "USERNAME" -f $HOME/.ssh/azure_vm
You will be prompted to provide a passphrase, but you can keep it empty. If it runs successfully, you will get a private file (azure_vm) and a public key file (azure_vm.pub) in the folder $HOME/.ssh/. Of course, you can choose different file names intead of using azure_vm here.
What is a Virtual Network(VNet)
VNet is a logically isolated network from each other in Azure. You can configure its IP address ranges, subnets, route tables, gateways, and security settings, much like a traditional network in a data center. Virtual Machines in the same VNet can access each other by default. VNet enables Azure resources, such as VMs, to securely communicate with each other, to the internet, and to on-premises networks.
Settings in Azure Portal
If you prefer to use the Portal to create a VM, the following picture shows how to configure the Networking settings for the VM.
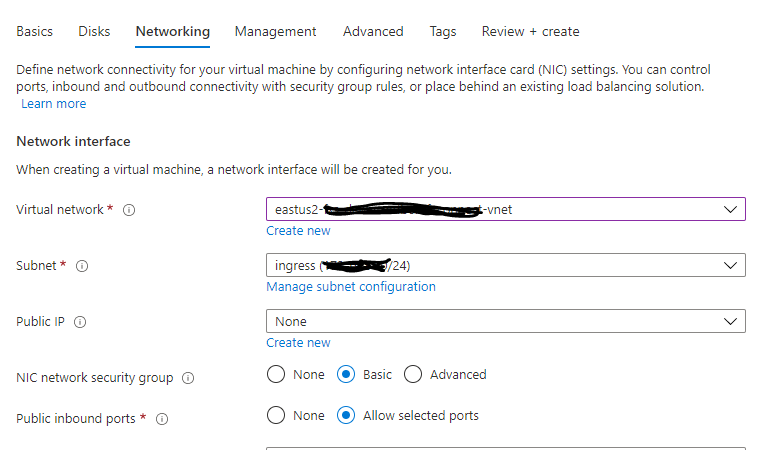
Here are three important settings need to note:
- Virtual network: select an existing virutal network or create a new one.
- Subnet: select a subnet associated with the selected virtual network.
- Public IP: use a public IP address if you want to connect to the VM from outside internet. Choose
Noneif you only need to communicate with the VM within the virtual network or your company networks.
Create from Azure CLI
You can run the following commands to create a Linux VM with a private IP address assigned automatically from the SUBNETID. The SUBNETID is obtained through running the command of az network vnet subnet show and passing the names of VNet Resource Group, VNet, and Subnet.
You can specify the VM name and admin username through changing the capitalized VM-NAME and USERANME, respectivley.
You can specify a static private IP address with --private-ip-address parameter, such ass --private-ip-address 192.168.1.101. In this example, I didn’t specify the private IP and let it assigned by the subnet automatically.
You can also specify a static public IP address with the --public-ip-address parameter. The public ip has been set to empty in the following command, which means the VM has no public ip and cannot be accessed from the outside internet.
export SUBNETID=$(az network vnet subnet show -g VNET-RESOURCE-GROUP-NAME --vnet-name VNET-NAME -n SUBNET-NAME -o tsv --query id)

az vm create \
  --resource-group RESOURCE-GROUP-NAME \
  --name VM-NAME \
  --image UbuntuLTS \
  --subnet "$SUBNETID" \
  --admin-username USERNAME \
  --public-ip-address "" \
  --location eastus2 \
  --ssh-key-values ~/.ssh/azure_vm.pub
Note: This command only works in Linux command environment. You have to use Windows Subsystem for Linux (WSL) on Windows 10, or you can run it in the Azure Cloud Shell.
Connect to VM throguh WinSCP
Once you created the VM either through portal or Cli, you use WinSCP/PuTTY to connect to the VM using the private ip within your privated network. You can download and install both WinSCP and PuTTY through this link.
To connect to the VM instance through WinSCP, you simply start WinSCP and login dialog will appear. On the dialog:
- Make sure New site node is selected.
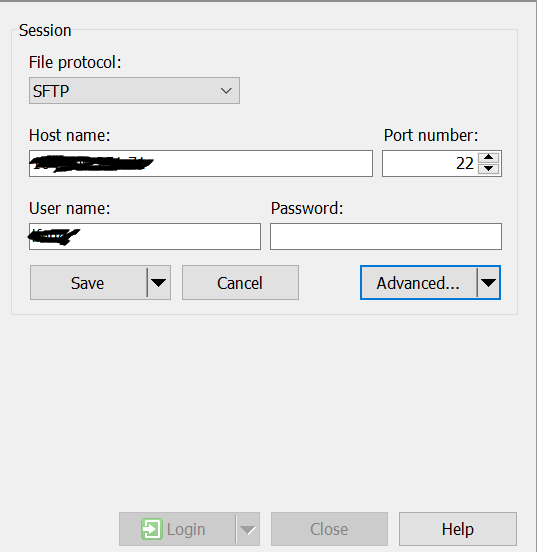
- On the New site node, make sure SFTP protocol is selected.
- Enter Host name with the public IP address of the created VM.
- Enter User name with the admin username when you create the VM.
- Click the Advanced… button to set up a public key authentication.
- Select Authentication under SSH, click the … to browse the private file path.
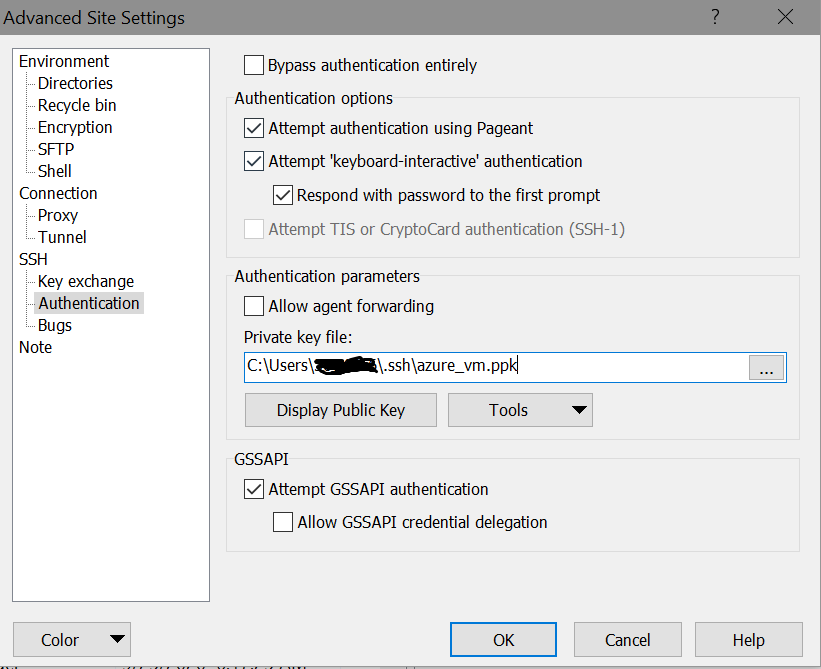
- Select the
azure_vmfile created from the command ofssh-keygen - Select
OKwhen it prompts to change OpenSSH private key format to PuTTY private key format. - Save the transfered
.ppkfile to the.sshfolder. - Save your site settings using the Save button.
- Login using the Login button.
Hope this post is helpful to you. Please feel free to leave your commments and suggestions.
References
https://docs.microsoft.com/en-us/azure/virtual-network/virtual-networks-overview
https://docs.microsoft.com/en-us/azure/virtual-network/virtual-networks-static-private-ip-arm-cli