To learn Microsoft Azure Virtual Machine, the first thing you want to try might be to create a VM and connect to it. If you follow the steps described in Microsoft’s official quickstart document, you most likely fail to connect to it, especially when you are under a company proxy. This post decribes the step-by-step process I performed to create a Linux VM and connect to it through WindSCP on Windows 10 under a company proxy.
Install Azure ClI
You can create a VM easily with the Azure Portal, but the Azure CLI would make the process even easier. Installing Azure CLI on Windows is pretty simply and straightforward. You just need to simply follow the steps described in the document of Install Azure CLI on Windows to install the Azure CLI through downloading the Microsoft Installer(MSI) or Powershell commands.
After installation, you can run az login to log into your azure account.
Create SSH Key Pairs
SSH keys are going to be used for security connection from your WinSCP/PuTTY to the Azure VM. I usually run the command ssh-keygen through Git Bash on Windows, but it seems that Windows most-recent updates caused all ssh related commands in Git Bash stop working. Thus I ran the following command in PowerShell to generate the SSH Key Pairs. Feel free to change the capitalized USERANME in the command, I always keep it the same to the username I will use in the VM that is going to be created next.
ssh-keygen -t rsa -b 4096 -C "USERNAME" -f $HOME/.ssh/azure_vm
You will be prompted to provide a passphrase, but you can keep it empty. If it runs successfully, you will get a private file (azure_vm) and a public key file (azure_vm.pub). Of course, you can choose different file names intead of using azure_vm here.
Create a Linux VM
You can run the following command to create a Linux VM with the ssh key file you created above. You can specify the VM name and admin username through changing the capitalized VM-NAME and USERANME, respectivley.
az vm create \
  --resource-group RESOURCE-GROUP-NAME \
  --name VM-NAME \
  --image UbuntuLTS \
  --admin-username USERNAME \
  --ssh-key-values ~/.ssh/azure_vm.pub
Note, above command assumes that you have already created a resource group, if not, you can create one through the following command:
az group create --name myResourceGroup --location eastus
It might take a few minutes to create the VM. Once create successfully, you can see the created VM in the Azure Portal.
Connect to VM under Proxy
If you are using Windows and under a compay proxy, WinSCP/PuTTY are the best choices to connect to the remote VM, because both of them have built-in support for tunneling through a HTTP proxy. This post describes the settings in WinSCP that is the closely cooperate with PuTTY SSH client. So the instructions here are also applicable to PuTTY. You can download and install both WinSCP and PuTTY through this link.
To connect to the VM instance through WinSCP, you simply start WinSCP and login dialog will appear. On the dialog:
- Make sure New site node is selected.
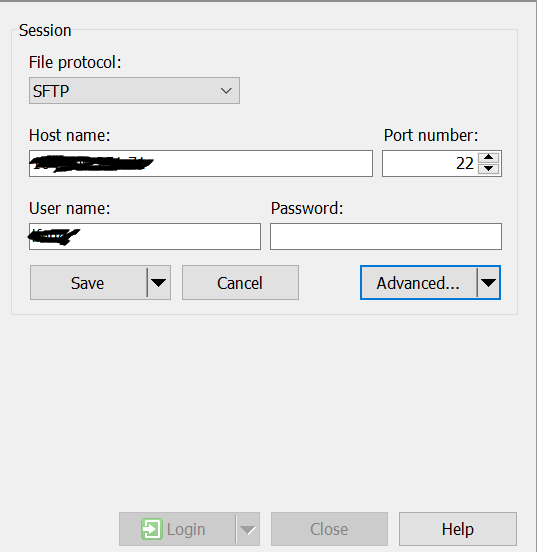
- On the New site node, make sure SFTP protocol is selected.
- Enter Host name with the public IP address of the created VM.
- Enter User name with the admin username when you create the VM.
- Click the Advanced… button to set up a public key authentication.
- Select Authentication under SSH, click the … to browse the private file path.
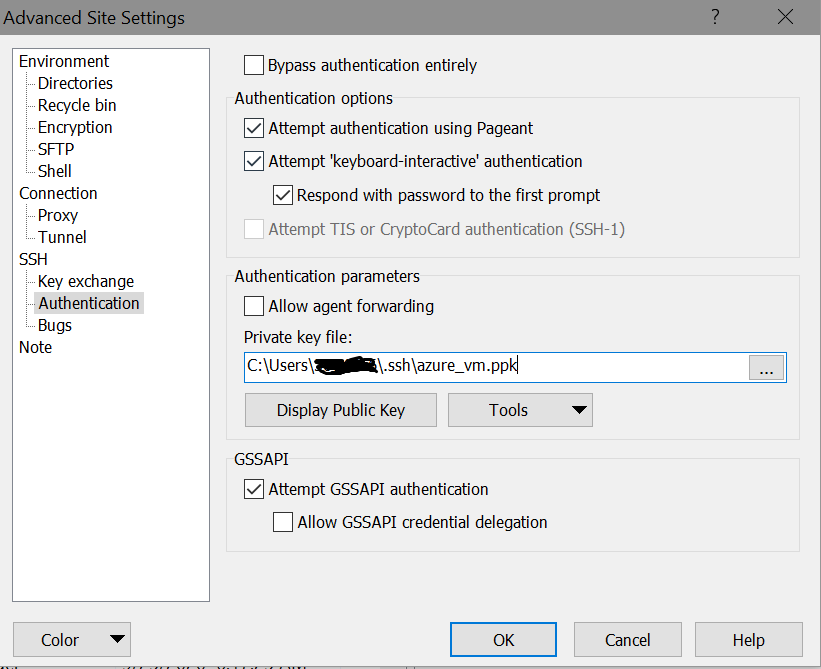
- Select the
azure_vmfile created from the command ofssh-keygen - Select
OKwhen it prompts to change OpenSSH private key format to PuTTY private key format. - Save the transfered
.ppkfile to the.sshfolder. - Select Proxy under Connection node.
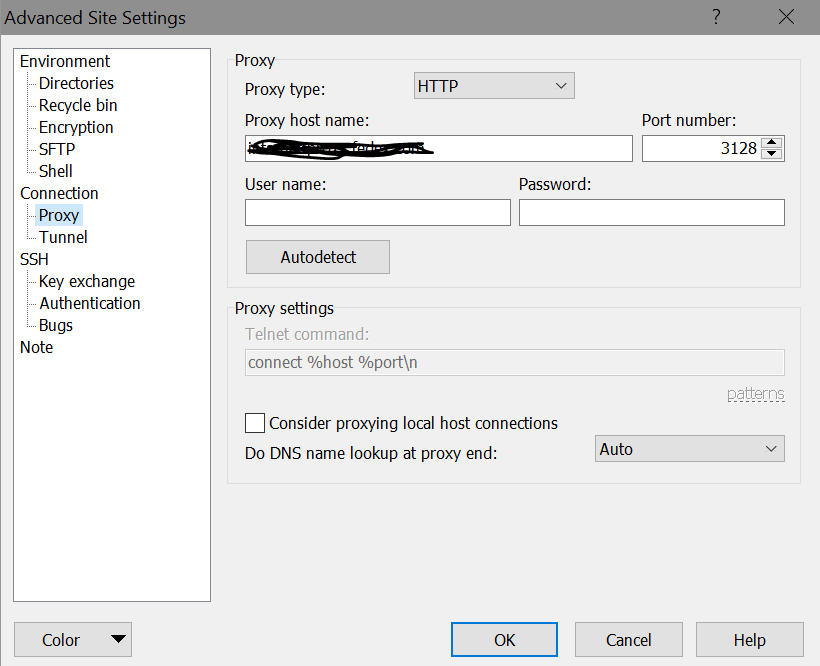
- Enter Proxy host name, Port number, if applicable, enter User name and Password
- Save your site settings using the Save button.
- Login using the Login button.
Hope this post is helpful to you. Please feel free to leave your commments and suggestions.
Reference
Quickstart - Create a Linux VM with Azure CLI
SSH suddenly stopped working in git-bash on Windows 10
Credit
Title picture comes from (https://unsplash.com/@casparrubin)