Microsoft Power BI Desktop can connect to many data sources, Oracle Database is one of the most popular ones. The missed steps on installation of Oracle client and ambiguous specification of ServerName/ServiceName in the Power BI’s official document make it hard to follow. This post aims to fill the gap with step-by-step instrucitons to figure out LDAP information for connecting to an Oracle Database, to install and configure an Oracle Data Access Client (ODAC), and to connect to an Oracle Database in Power BI Desktop.
 Picture comes from (https://unsplash.com/@goumbik)
Lightweight Directory Application Protocol (LDAP) Connection in SQL Developer
There are serveral software clients can be used to connect to Oracle Database, Oracel SQL Developer might be the most popular one.LDAP is the most secure and popular way for Enterprise to manage user access to Oracle Databases. The LDAP servers information can be specified in both JDBC URL and LDAP types of connection.
Custom JDBC URL
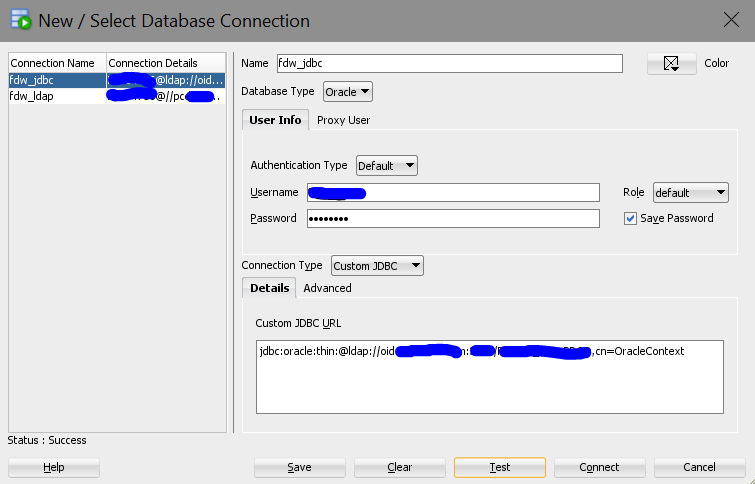
The picture above shows an example of Custom JDBC connection to an Oracle Database. The conncetion string in the Custom JDBC URL box usually has the format below:
jdbc:oracle:thin:@ldap://[ldapservername:ldapport]/[DBservicename],[DomainContext]
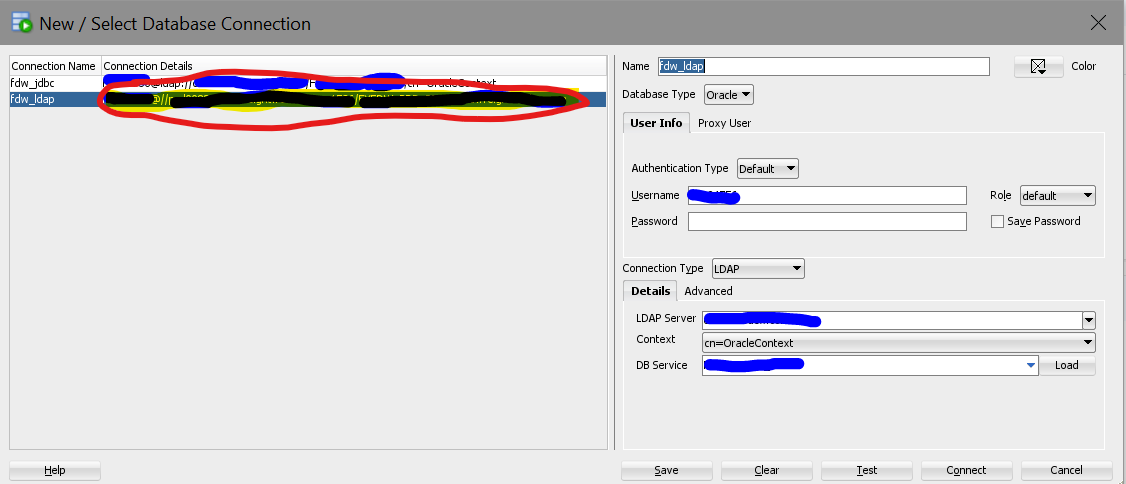
LDAP Connection
The picture below shows the LDAP Connection with the same connection information from the JDBC URL above. The the fields of LDAP Server, Context, and DB Service should have the same values as ldapservername:ldapport, DomainContext, and DBservicename from the Custom JDBC URL above.
In fact, if you don’t have the LDAP Connection, you can use the following steps to create one from the above custom JDBC URL in SQL Developer:
- Create a new connection with a new Name
- Fill in your Username and/or Password
- Select
LDAPin the Connection Type drop-down list - Put the
ldapservername:ldapportfrom the above custom JDBC URL into the LDAP Server field - The Context should be loaded autoamatically, if not, you can copy
DomainContextfrom the JDBC - Click the Load button to load the
DBservicenamein the DB Service, if it cannot load, you can copy and paste theDBservicenamefrom JDBC URL. - Test the connection, if succeffuly, click the Save button.
After creating the new connection, if you expand the left panel, you can find the Connection Details of the new LDAP connection, shown as the highlighted area below:
The Connection Details has the following format:
[username]@//[servername]:[serverport]/[servicename]
Want to clarify that the servername, serverport and servicename from the Connection Details are the fully qualified domain name (FQDN) for the Oracle host resolved from the LDAP.
Install and Configure ODAC
Step 1: Uninstall any existing version of ODAC
If you have installed the Xcopy version, to uninstall all ODAC products, execute the following command in the Oracel Home directory:
uninstall.bat all odac
If you have installed non-Xcopy version, you can run the Universal Installer as Administrator. You can find it through: Start -> All programs -> Oracle - OraClient12Home1 ->Oracle Installation Products->Universal Installer.
Note: If none of above works, you can also delete the folder of the ODAC client folder C:\app\client\ and folder of C:\Program Files\Oracle directly.
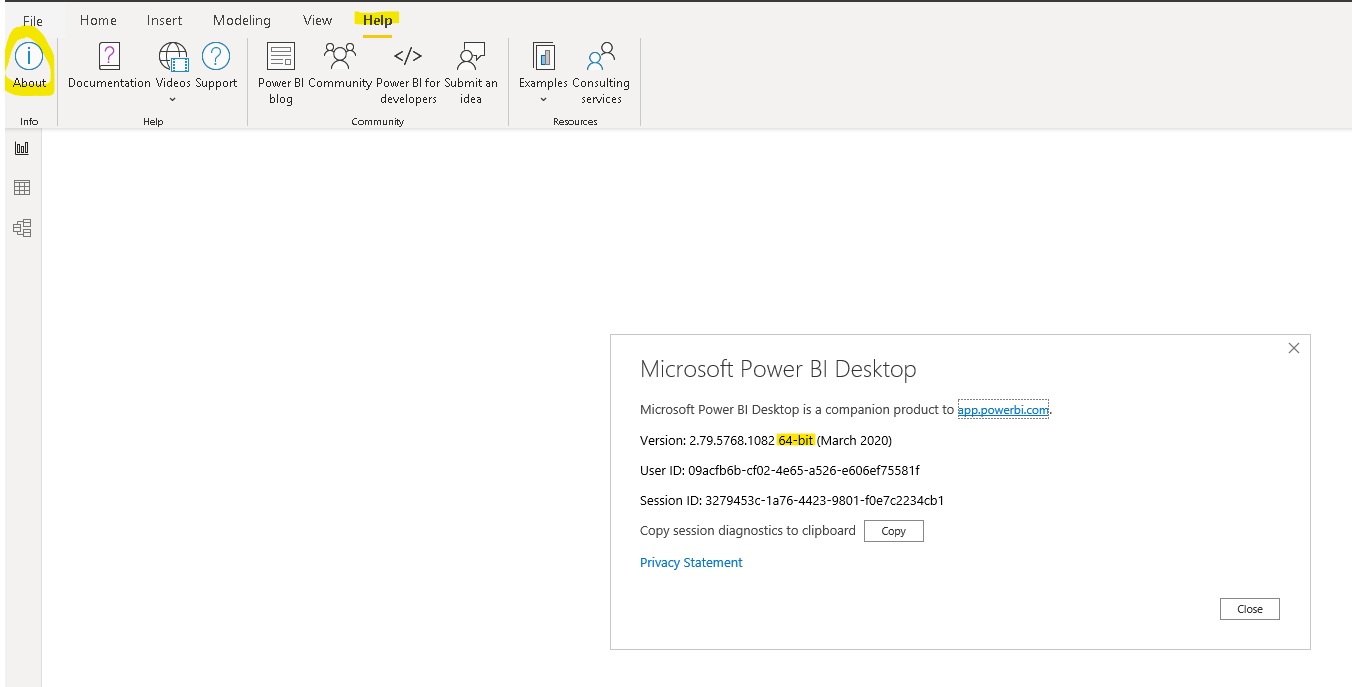
Step 2: Check Power BI Desktop Version
You can find the version information from Power BI Desktop -> Help -> About. The following is a screenshot of 64-bit version.
Step 3: Download ODAC Installation File
The installation file can be downloaded from ODAC download page. In my case, I have downloaded ODAC122011_x64.zip from the 64-bit ODAC 12.2c Release 1 (12.2.0.1.1) for Windows x64 section.
Step 4: Install ODAC
Unzip the downloaded file and double-click the setup.exe in the unzipped folder to start the installation process:
-
Choose your preferred language

-
Choose Use Existing Windows User. In my case, my username is
corp\<EMP_ID>and password is my LDAP password.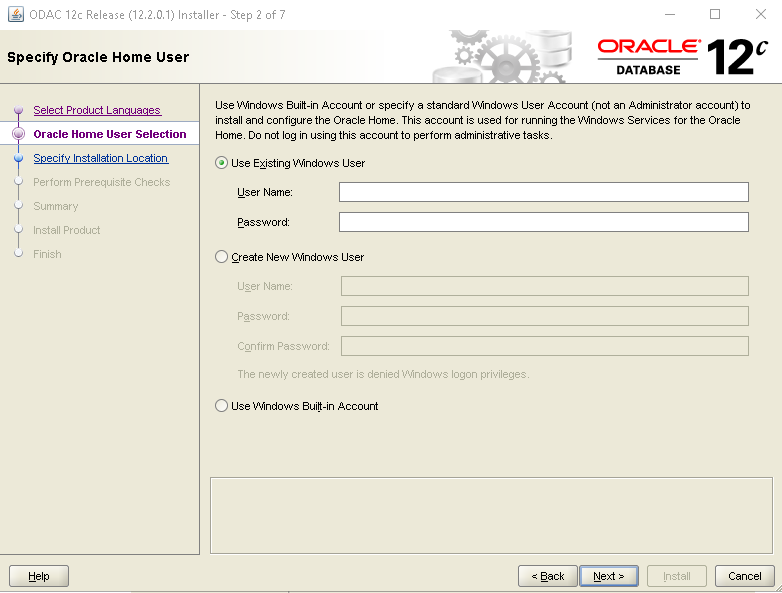
-
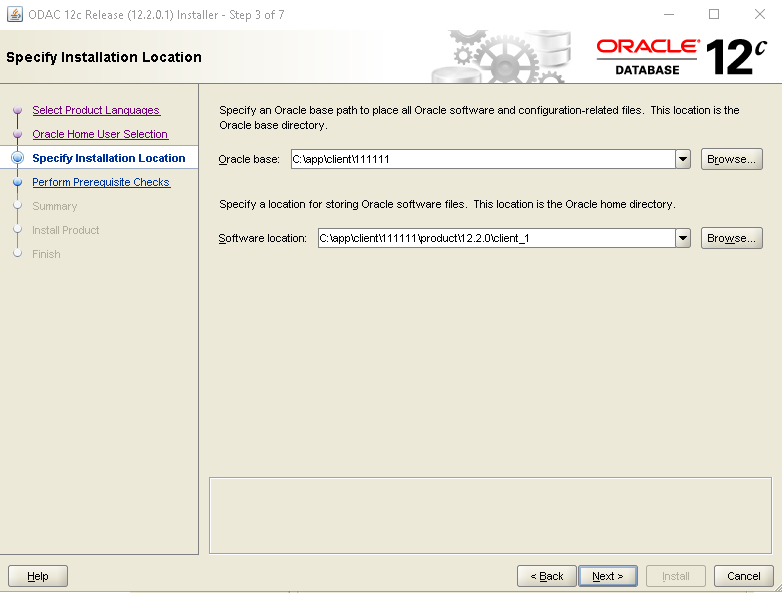
Use the default Oracle base and Software location.
-
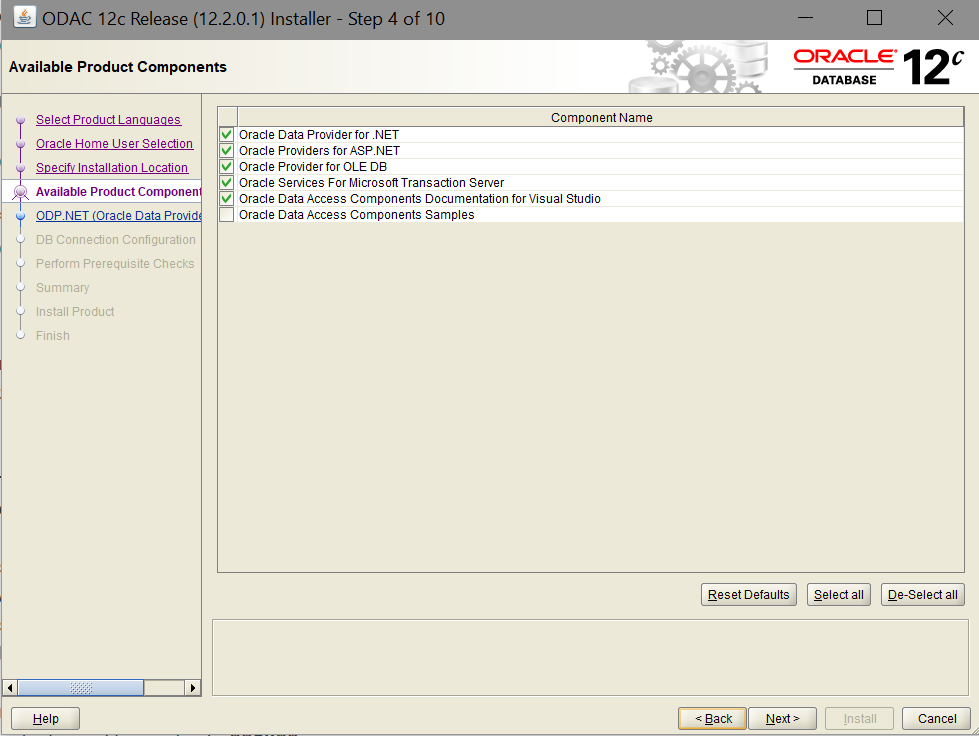
Use the default Available Product Components.
-
It is recommended to configure ODP.NET for machine-wide level

-
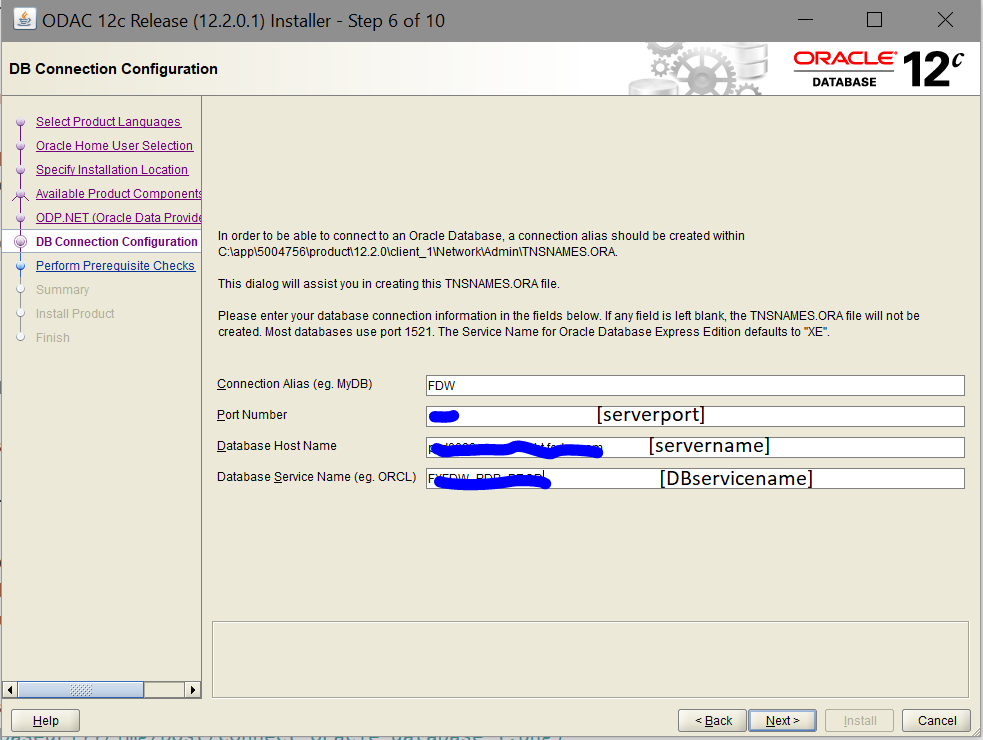
It is O.K. to leave the DB Connection Configuration fields empty, because we are going to use the LDAP configurations. You can also fill them out with the corresponding information from the section LDAP Connection in SQL Developer as shown in the picture below.
-
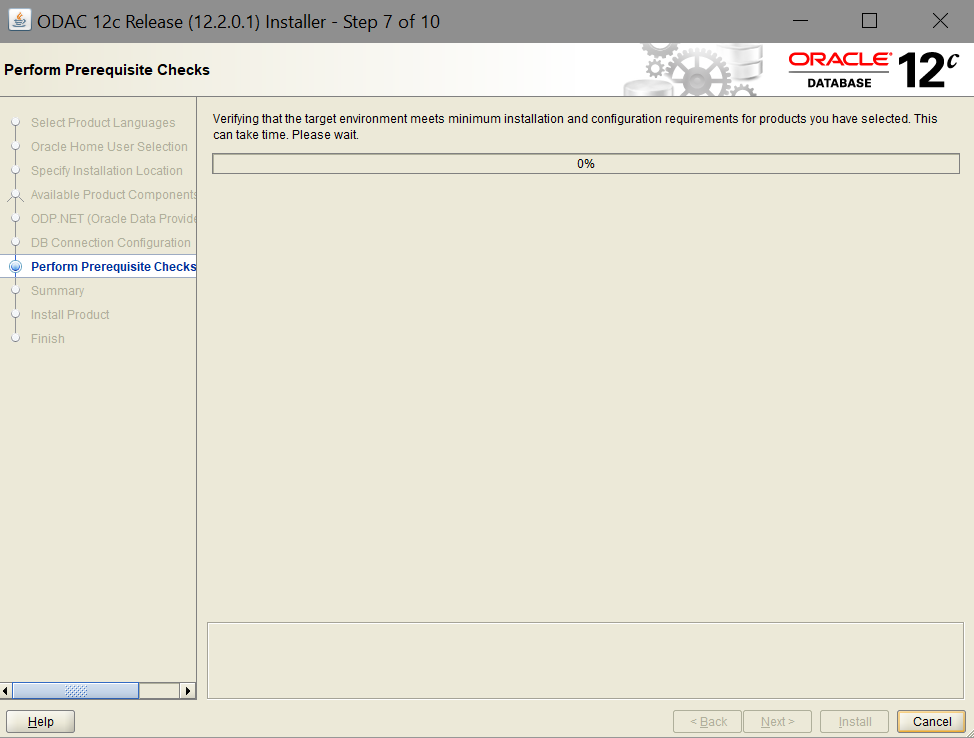
If you get error on pre-requisite check on certain items, you can just uncheck the boxes or select ignore all, and continue.
-
The remaining installation steps are pretty straight forward. The installation will take couple of minutes.
Step 5: Configure Connection
- After installation, navigate to installation directory (Oracle home), which is the Software location in the step of Specify Installation Location above. Then go into Network > Admin.
- Create two files of
ldap.oraandsqlnet.ora, if they are not generated automatically. - The content of file
ldap.orashould be similar to the following:
DIRECTORY_SERVERS = (oid.myinfo.domain.com:3060)
DIRECTORY_SERVER_TYPE =oid
DEFAULT_ADMIN_CONTEXT="cn=OracleContext, dc=DomainContext"
Note: You need to update above DIRECTORY_SERVERS to your [ldapservername:ldapport] and DEFAULT_ADMIN_CONTEXT to your [DomainContext].
- File
sqlnet.orashould have the follwing content in it:
NAMES.DIRECTORY_PATH= (LDAP, TNSNAMES, EZCONNECT)
- If you updated the DB Connection Configuration fields during the installation, you will find the file
tnsnames.orashould have the following content.
FDW =
   (DESCRIPTION =
    (ADDRESS = (PROTOCOL = TCP)(HOST = [servername])(PORT = [serverport]))
    (CONNECT_DATA =
      (SERVER = DEDICATED)
      (SERVICE_NAME = [DBservicename])
    )
  )
Connect to Oracle Database in Power BI Desktop
With above ODAC installation and configurations, you can take the following steps to conncet to the Oracle Database in Power BI Desktop:
- From the Home tab, select Get Data
- From the Get Data window that appears, select More (if necessary), select Database -> Oracle database, and then select Connect
- Put the
[DBservicename]in the Server box. If the OID is created with onlycn=OracleContext, then you need to append a dot at the end of service name. For my case, my service name is ABC_DEFG and the OID is created only context ofcn=OracleContext, I need to specify the server as ABC_DEFG..
Note: if [DBservicename]does not work, use the string of [servername]:[serverport]/[servicename] from the above connection details of LDAP Connection in SQL Developer to the Server field.
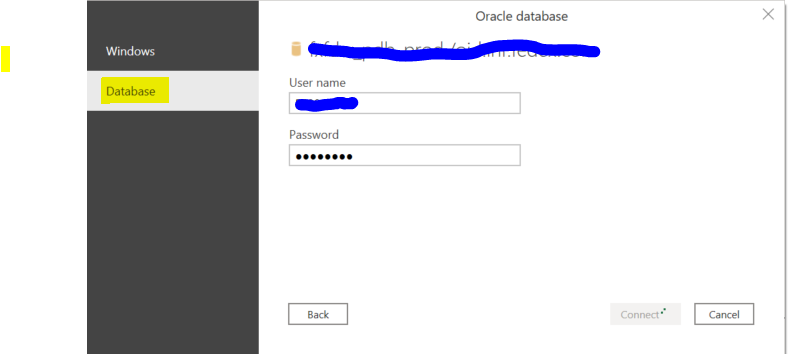
- If asked, use the Database credentials to connect to the database.
I hope this post is helpful. If I missed anything, please let me know in the comments.
References
https://docs.microsoft.com/en-us/power-bi/connect-data/desktop-connect-oracle-database#installing-the-oracle-client
https://blogs.oracle.com/oraclemagazine/making-database-connections
https://medium.com/@eikonomega/connecting-to-oracle-database-with-cx-oracle-and-ldap-5da7925a305c
http://technologydribble.info/2015/02/10/how-to-create-an-oracle-database-link-using-ldap-authentication/
https://docs.oracle.com/cd/E11882_01/network.112/e10835/ldap.htm#NETRF011
https://www.oracle.com/database/technologies/install-odac-12c-122010.html