Auzre Machine Learing Workspace provides a centralized platform to work with all aspects of Machine Learning, from creating and training ML models to publishing the models to services. This post describes the steps you can follow to train a ML model and deploy the trained model as web service on a Azure Kubernetes Service (AKS) cluster in Azure ML Workspace.
1. Prerequisites
In order to follow the steps described herein and run the notebook, you need to have:
- An Azure Machine Learning workspace. For more information, see Create an Azure Machine Learning workspace
- A Computer Instance that can run this notebook. For more information, see Create and Manage Azure Machine Learning Compute Instance
- An Azure Kubernetes Service Inference cluster. For more information, seee Create and Attach an Azure Kubernetes Service cluster
You can find the training data and associated notebook from the github repository.
2. Install and Update the Azure Machine Learning SDK
The Azure Machine Learning SDK is updated frequently. Run the following command to install/upgrade to the latest release, along with the additional package to support notebook widgets.
!pip install --upgrade azureml-sdk azureml-widgets
3. Connect to your workspace
With the latest version of the SDK installed, use the following commands to connect to your workspace.
Note: If you haven’t already established an authenticated session with your Azure subscription, you’ll be prompted to authenticate by clicking a link, entering an authentication code, and signing into Azure.
import azureml.core
from azureml.core import Workspace

# Load the workspace from the saved config file
ws = Workspace.from_config()
print('Ready to use Azure ML {} to work with {}'.format(azureml.core.VERSION, ws.name))
4. Train and register a model
The following code snippet comes from Azure MSLearn-DP100 training course, which creates a decision tree binary classification model to predict diabetes. After training the models, it also registers the model in the Azure ML workspace. The registered model will be deployed to the AKS cluster in the following sections.
from azureml.core import Experiment
from azureml.core import Model
import pandas as pd
import numpy as np
import joblib
from sklearn.model_selection import train_test_split
from sklearn.tree import DecisionTreeClassifier
from sklearn.metrics import roc_auc_score
from sklearn.metrics import roc_curve

# Create an Azure ML experiment in your workspace
experiment = Experiment(workspace=ws, name="diabetes-decisiontree")
run = experiment.start_logging()
print("Starting experiment:", experiment.name)

# load the diabetes dataset
print("Loading Data...")
diabetes = pd.read_csv('data/diabetes.csv')

# Separate features and labels
X, y = diabetes[['Pregnancies','PlasmaGlucose','DiastolicBloodPressure','TricepsThickness','SerumInsulin','BMI','DiabetesPedigree','Age']].values, diabetes['Diabetic'].values

# Split data into training set and test set
X_train, X_test, y_train, y_test = train_test_split(X, y, test_size=0.30, random_state=0)

# Train a decision tree model
print('Training a decision tree model')
model = DecisionTreeClassifier().fit(X_train, y_train)

# calculate accuracy
y_hat = model.predict(X_test)
acc = np.average(y_hat == y_test)
print('Accuracy:', acc)
run.log('Accuracy', np.float(acc))

# calculate AUC
y_scores = model.predict_proba(X_test)
auc = roc_auc_score(y_test,y_scores[:,1])
print('AUC: ' + str(auc))
run.log('AUC', np.float(auc))

# Save the trained model
model_file = 'diabetes_model.pkl'
joblib.dump(value=model, filename=model_file)
run.upload_file(name = 'outputs/' + model_file, path_or_stream = './' + model_file)

# Complete the run
run.complete()

# Register the model
run.register_model(model_path='outputs/diabetes_model.pkl', model_name='diabetes_model',
                   tags={'Training context':'Inline Training'},
                   properties={'AUC': run.get_metrics()['AUC'], 'Accuracy': run.get_metrics()['Accuracy']})

print('Model trained and registered.')
5. Deploy the model as a web service
With the registered machine learning model then you can deploy it as a web service on the AKS inferencing cluster. Before doing that, you can use the following commands to print out the model name and version you are going to deploy.
model = ws.models['diabetes_model']
print(model.name, 'version', model.version)
With the regiestered ML model, we’re going to create a web service to host this model. This requires some entry code and configuration files. The following steps are creating them. First, let’s create a folder for those files.
import os

folder_name = 'diabetes_service'

# Create a folder for the web service files
experiment_folder = './' + folder_name
os.makedirs(experiment_folder, exist_ok=True)

print(folder_name, 'folder created.')

# Set path for scoring script
script_file = os.path.join(experiment_folder,"score_diabetes.py")
print(script_file)
5.1. Create Entry Script File
The web service where we deploy the model will need some Python code to load the input data, get the model from the workspace, and generate and return predictions. We’ll save this code in an entry script (also often called a scoring script) that will be deployed to the web service:
%%writefile $script_file
import json
import joblib
import pandas
import numpy as np
from azureml.core.model import Model
from azureml.core import Workspace, Datastore, Dataset, Experiment,Run, Model
from azureml.core.authentication import ServicePrincipalAuthentication

# Called when the service is loaded
def init():
    global model
    # Get the path to the deployed model file and load it
    model_path = Model.get_model_path('diabetes_model')
    model = joblib.load(model_path)

# Called when a request is received
def run(raw_data):

    # Get the input data as a numpy array
    data = np.array(json.loads(raw_data)['data'])
    # Get a prediction from the model
    predictions = model.predict(data)
    # Get the corresponding classname for each prediction (0 or 1)
    classnames = ['not-diabetic', 'diabetic']
    predicted_classes = []
    for prediction in predictions:
        predicted_classes.append(classnames[prediction])
    # Return the predictions as JSON
    return json.dumps(predicted_classes)
5.2. Create Conda Dependencies File
The web service will be hosted in a container, and the container will need to install any required Python dependencies when it gets initialized. In this case, our scoring code requires scikit-learn, so we’ll create a .yml file that tells the container host to install this into the environment.
from azureml.core.conda_dependencies import CondaDependencies

# Add the dependencies for our model (AzureML defaults is already included)
myenv = CondaDependencies()
myenv.add_conda_package('scikit-learn')
#myenv.add_conda_package('python_version=3.6.2')
# Save the environment config as a .yml file
env_file = os.path.join(experiment_folder,"diabetes_env.yml")
with open(env_file,"w") as f:
    f.write(myenv.serialize_to_string())
print("Saved dependency info in", env_file)
With the registered model and generated files of entry script and conda dependencies, you’re ready to deploy the model to the Kubernetes cluster named aks-cluster. You can do this either through the portal or script.
5.3.1. Deploy through Portal
- Go to the Models page.
- Select the regiestered model that you are going to deploy.
- Select Deploy on the top
- Fill the Deploy a model table with the below info:
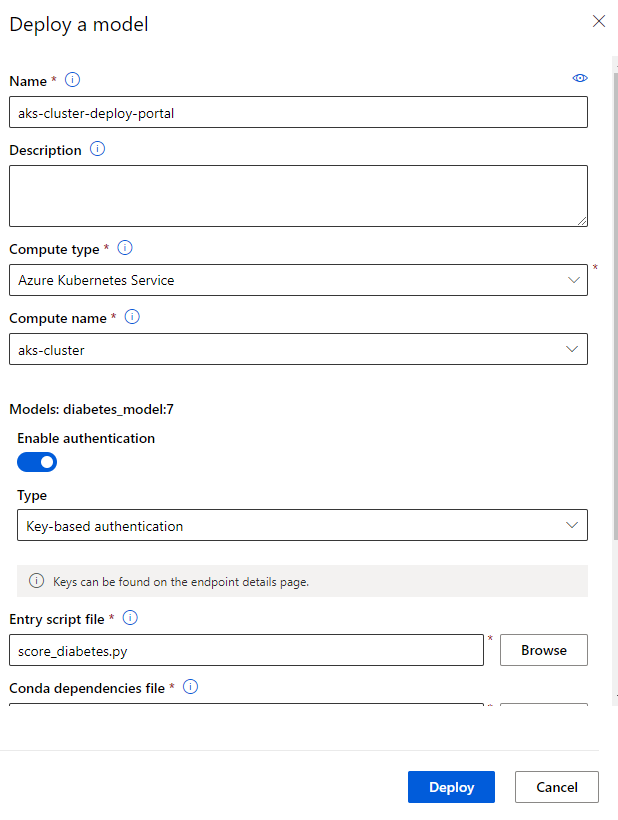
Deployment will take some time as it first runs a process to create a container image, and then runs a process to create a web service based on the image. When deployment has completed successfully, you’ll see a status of Healthy.
5.3.2. Deploy through Scripts
The following deployment script includes the following steps:
- Define an inference configuration, which includes the scoring and environment files required to load and use the model.
- Define a deployment configuration that defines the execution environment in which the service will be hosted. In this case, an Azure Kubernetes cluster.
- Deploy the model as a web service.
- Verify the status of the deployed service.
More Information: For more details about model deployment, and options for target execution environments, see the documentation.
Deployment will take some time as it first runs a process to create a container image, and then runs a process to create a web service based on the image. When deployment has completed successfully, you’ll see a status of Healthy.
from azureml.core.webservice import AksWebservice
from azureml.core.model import InferenceConfig
from azureml.core.compute import AksCompute

# Configure service name and cluster target
service_name = "aks-cluster-deploy-script"

aks_target = AksCompute(ws,"aks-cluster")

# Configure the scoring environment
inference_config = InferenceConfig(runtime= "python",
                                   entry_script=script_file,
                                   conda_file=env_file)

deployment_config = AksWebservice.deploy_configuration(cpu_cores = 1, memory_gb = 2, auth_enabled=True)


service = Model.deploy(ws, service_name, [model], inference_config, deployment_config, aks_target)

service.wait_for_deployment(True)
print(service.state)
Hopefully, the deployment has been successful and you can see a status of Healthy. If not, you can use the following code to get the service logs to help you troubleshoot.
6. Use the web service
When the service deployed successfuly, we can view the Endpoints page for the deployed services in your workspace and get the connection info (URL and Authenticaion) from the Consume tab of the deployed endpoints.
Now we can consume the endpoint service from a client application that can simply make an HTTP request, sending the patient data in JSON format, and receive back the predicted class(es).
endpoint = 'http://40.70.170.182:80/api/v1/service/aks-cluster-deploy-script/score' #Replace with your endpoint
key ='8dd7dgAKxa97pBCcuaxS8OxAjG8EZvDw' #Replace with your key

import requests
import json

x_new = [[2,180,74,24,21,23.9091702,1.488172308,22],
         [0,148,58,11,179,39.19207553,0.160829008,45]]

# Convert the array to a serializable list in a JSON document
input_json = json.dumps({"data": x_new})

# Set the content type
headers = {"Content-Type":"application/json",
           "Authorization":"Bearer " + key}


predictions = requests.post(endpoint, input_json, headers = headers)
predicted_classes = json.loads(predictions.json())

for i in range(len(x_new)):
    print ("Patient {}".format(x_new[i]), predicted_classes[i] )
References
Create an Azure Machine Learning workspace