This post describes the process to install Hortontworks HDP 3.1.0 on a cluster of three VMWare virtual machines. The process includes four major steps: 1) set up the cluster environemnt; 2) set up a local repository for both Ambari and HDP stacks; 3) Install Ambari server and agent; 4) install, configure and deploy the cluster.
This installation process might work for other versions too. Please check the product versions through Hortonworks support matrix: https://supportmatrix.hortonworks.com/
Table of Content
- Table of Content
- Virtual Nodes Info
- 1. Prepare the Cluster Environment
- 2. Set up a Local Repository for Ambari and HDP Stack
- 3. Install Ambari Server and Agent
- 4. Install, Configure and Deploy the Cluster
- Known Errors
- References
Virtual Nodes Info
Three virtual machines in VMWare with following settings. RedHat Enterprise 7.6 has been installed on each node.
| Host Name | Host IP | Configuration |
|---|---|---|
| hadoop-master | 146.xxx.xxx.75 | 4 x cpu, 16 GB Ram, 100 GB disk |
| hadoop-node-1 | 146.xxx.xxx.76 | 4 x cpu, 16 GB Ram, 100 GB disk |
| hadoop-node-2 | 146.xxx.xxx.77 | 4 x cpu, 16 GB Ram, 100 GB disk |
1. Prepare the Cluster Environment
1.1. Setting Proxy
If you’re behind a proxy, you need to specify your proxy server information, because many repositories, including yum, are accessed through the proxy servers. For each host, you can set up proxy server info through adding
export https_proxy=https://<your.https-proxy.address>:<port#>
export http_proxy=http://<your.http-proxy.address>:<port#>
to the /root/.bashrc. Remember to run source .bashrc to refresh.
1.2. Make sure run level is multi-user text mode
Run following command to check the run level:
systemctl get-default
It is expected to see the response of multi-user.target. If not, run the following command to set the run level to multi-user text mode:
systemctl set-default multi-user.target
1.3. Check and set hostnames
Set Hostnames
For each host in the cluster, confirm that the hostname is set to a Fully Qualified Domain Name (FQDN) name by running the following command:
hostname -f
This should return a host name that has a format like fully.qualified.doman.name
You can use hostname command to set the hostname, for example:
hostname hadoop-master.qualified.doman.name
Edit Network Configuration File
For each host in the cluster, open the network configuration file through
vi /etc/sysconfig/network
Modify the HOSTNAME property to its FQDN:
NETWORK=yes
HOSTNAME=fully.qualified.doman.name
Edit Hosts File
For each host in the cluster, open the hosts file through running vi /etc/hosts add a line to each file. For example:
146.xxx.xxx.75 hadoop-master.qualified.doman.name hadoop-master
146.xxx.xxx.76 hadoop-node-1.qualified.doman.name hadoop-node-1
146.xxx.xxx.77 hadoop-node-2.qualified.doman.name hadoop-node-2
It needs reboot to make these changes effective.
1.4. Set up password-less SSH
For the master host
- Login to the
hadoop-masterhost withrootuser and generate SSH keys usingssh-keygen -t rsa. Press enter for all prompts and accept all default values. -
Run the following command
ssh-copy-id localhostto copy ssh identification for localhost. Enter password when prompted for the password: - Then run command
ssh hadoop-masterto make sure no password needed.
For each of other hosts in the cluster:
- Copy the SSH file from
hadoop-masterto every other hosts in the cluster, through running:
scp -pr /root/.ssh root@hadoop-node-1.qualified.doman.name:/root/
- Upload the generated
id_rsa.pubto theroot’s .ssh directory as a file with name authorized_keys, through running:
cat .ssh/id_rsa.pub | ssh root@hadoop-node-1.qualified.doman.name 'cat >> .ssh/authorized_keys'
- Set permissions for .ssh directory and authorized_keys file:
ssh root@hadoop-node-1.qualified.doman.name; chmod 700 .ssh; chmod 640 .ssh/authorized_keys
From the hadoop-master host, run following commands to make sure inter-node connection using SSH without password:
ssh hadoop-node-1
ssh hadoop-node-2
ssh hadoop-master
ssh hadoop-node-2
ssh hadoop-node-1
ssh hadoop-master
1.5. Enable NTP
Run following commands on each host to install and enable NTP service:
yum install -y ntp
systemctl enable ntpd
systemctl start ntpd
Run timedatectl status and look for following lines to verfiy that NTP is running
NTP enabled: yes
NTP synchronized: yes
Otherwise, you need to force NTP synchronze through the following steps:
- Stop ntp serivce:
systemctl stop ntpd - Add
server your.ntp.server.addressto the/etc/ntp.conf‘s servers part. - Force time synchronize:
ntpdate your.ntp.server.address - Restart ntp:
systemctl start ntpd - Run
systemctl enable ntpdateto make sure running thentpdateat boot time.
1.6. Configure firewall
Run the following commands to disable firewall on each host in the cluster:
systemctl disable firewalld
service firewalld stop
Run systemctl status firewalld to make sure firewall is disabled.
1.7. Disable SElinux
For each host in the cluster, change SELINUX value from enhancing to disabled in /etc/selinux/config
2. Set up a Local Repository for Ambari and HDP Stack
2.1. Create and start an HTTP sever on the master host:
Install and start Apache Server through the following commands:
yum install -y httpd
service httpd restart
chkconfig httpd on
Make sure the directory /var/www/html has been created on the host.
2.2. Set up the local repository
- Download the tarball files for Ambari and HDP stacks through running the following commands:
wget http://public-repo-1.hortonworks.com/ambari/centos7/2.x/updates/2.7.3.0/ambari-2.7.3.0-centos7.tar.gz

wget http://public-repo-1.hortonworks.com/HDP/centos7/3.x/updates/3.1.0.0/HDP-3.1.0.0-centos7-rpm.tar.gz

wget http://public-repo-1.hortonworks.com/HDP-UTILS-1.1.0.22/repos/centos7/HDP-UTILS-1.1.0.22-centos7.tar.gz

wget http://public-repo-1.hortonworks.com/HDP-GPL/centos7/3.x/updates/3.1.0.0/HDP-GPL-3.1.0.0-centos7-gpl.tar.gz
The URLs can be obtained from Ambari Repositories and HDP 3.1.0 Repositories
- Untar and copy the files to
/var/www/html/. For example,tar zxvf ambari-2.7.3.0-centos7.tar.gz -C /var/www/html/ -
Then record the local base URLs which are needed for installing the cluster:
 Ambari: http://146.xxx.xxx.75/ambari/centos7/2.7.3.0-139/
 HDP: http://146.xxx.xxx.75/HDP/centos7/3.1.0.0-78/
 HDP-GPL: http://146.xxx.xxx.75/HDP-GPL/centos7/3.1.0.0-78/
 HDP-UTILS: http://146.xxx.xxx.75/HDP-UTILS/centos7/1.1.0.22/
Tips:
- make sure you can browser in the web browser;
- The path where you can see the
repodatadirectory.
3. Install Ambari Server and Agent
3.1. Download Ambari repository
- Login to the
hadoop-masterhost asroot - Check the repository URL from Ambari Repository Links
- Download Ambari repository file to the directory
/etc/yum.repos.d/, through the following command:
wget -nv http://public-repo-1.hortonworks.com/ambari/centos7/2.x/updates/2.7.3.0/ambari.repo -O /etc/yum.repos.d/ambari.repo
- Edit the
ambari.repofile and change thebaseurlandgpgkeyto the local repository obtained in step 2.2. - Run
yum repolistto confirm that the repository has been configured successfully. You should seeambari-2.7.3.0-xxxon the list.
See Download Ambari Repository for more information.
3.2. Install Ambari server
Install Ambari server on the master node through command:
yum install -y ambari-server
See Install Ambari Server for more information.
3.3. Set up Ambari server
Set
-Dhttp.proxyHost=<yourProxyHost> -Dhttp.proxyPort=<yourProxyPort> -Dhttps.proxyHost=<yourProxyHost> -Dhttps.proxyPort=<yourProxyPort>
in the file /var/lib/ambari-server/ambari-env.sh
Run following command on the Ambari server host to start the setup process:
ambari-server setup
See Set Up Ambari Server for more information.
4. Install, Configure and Deploy the Cluster
4.1. Start the Ambari server
You can start the Ambari server through running:
ambari-server start
After the server starts successfully, you can login to the server with default username/password admin/admin at: http://146.xxx.xxx.75:8080/
4.2. Install HDP through installation wizard
Follow the steps of the Wizard to intall HDP:
-
Step 0 - Get Started: give a name to your cluster, for example,
MyHadoop -
Step 1 - Select Version: select
HDP-3.1,Use Local Repository. Delete all other OS, leave Redhat7 only. Copy the local base URL to the places. -
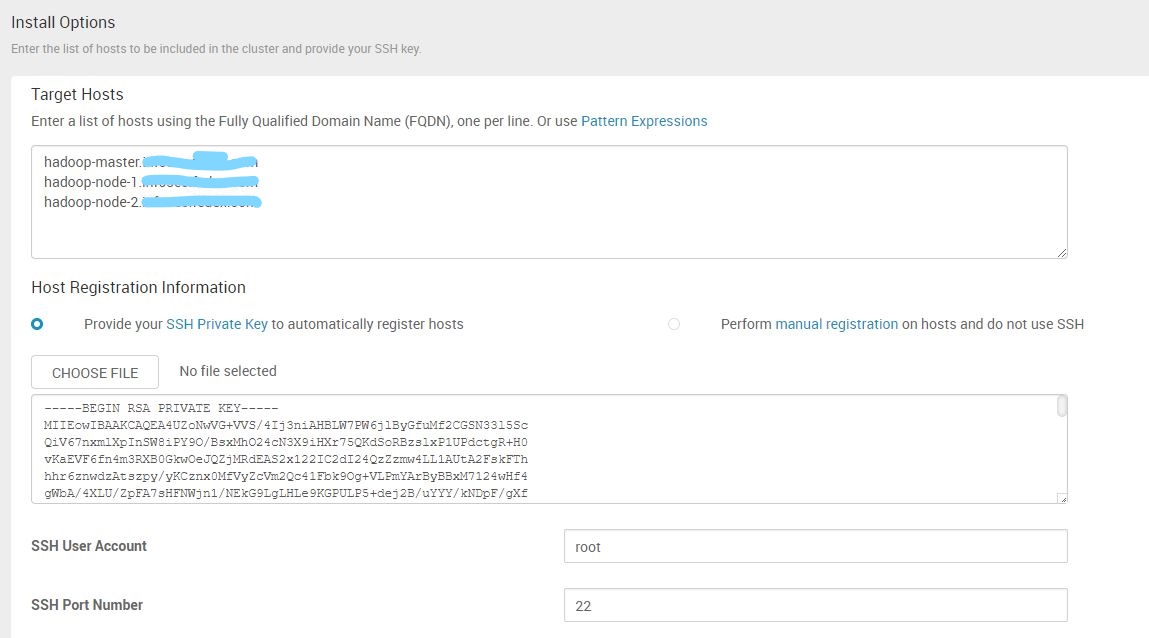
Step 2 - Install Options settings:
-
Step 3 - Confirm Hosts: it will automatically do the regiestration with the settings from Step 2.
-
Step 4 - Choose Services: choose basic ones, you can add more later.
-
Step 5 - Assign Masters: keep default
-
Step 6 - Select all for the
Clientoption.
Known Errors
There are the four errors I encountered during the installation process.
Error 1: emtpty HDP Url: https://community.hortonworks.com/articles/231020/ambari-273-ambari-writes-empty-baseurl-values-writ.html
Error 2: Requires libtirpc-devel: https://community.hortonworks.com/idea/107386/libtirpc-devel-required.html Run following commands on all hosts:
subscription-manager repos --enable=rhel-7-server-optional-rpms
yum install -y libtirpc-devel
Error 3 Hive install failed because of mysql-connector-java.jar due to HTTP error: HTTP Error 404: Not Found https://community.hortonworks.com/articles/170133/hive-start-failed-because-of-ambari-error-mysql-co.html Run following commands on Ambari server:
yum install -y mysql-connector-java
ls -al /usr/share/java/mysql-connector-java.jar
cd /var/lib/ambari-server/resources/
ln -s /usr/share/java/mysql-connector-java.jar mysql-connector-java.jar
Error 4 Empty Baseurl for Public Repository (No solution, might be proxy issue): https://community.hortonworks.com/questions/45147/ambari-setup-select-stack-404-error.html https://community.hortonworks.com/questions/35820/hdp-stack-repositories-not-found.html
Error 5 Ambari Files View - Service hdfs check failed: Solved: In order to fix it you should try creating a new “File View” instance by clicking on the “Create Instance” button on the File View. You can choose the default options to create the view instance (if it is not kerberized) https://community.hortonworks.com/questions/128758/service-hdfs-check-failed-from-ambari.html?page=1&pageSize=10&sort=votes
https://community.hortonworks.com/questions/176438/ambari-files-view-service-hdfs-check-failed.html
https://community.hortonworks.com/questions/88350/service-hdfs-check-failed-1.html
https://community.hortonworks.com/questions/131550/ambari-views-fail-after-kerberos-enabled.html
References
Official HDP 3.10 installation documentation: https://docs.hortonworks.com/HDPDocuments/HDP3/HDP-3.1.0/index.html
Apache Ambari Installation Document: https://docs.hortonworks.com/HDPDocuments/Ambari-2.7.3.0/bk_ambari-installation/content/ch_Getting_Ready.html
Check Hortonworks Support Matrix to make sure product versions: https://supportmatrix.hortonworks.com/
Using yum with a Proxy server: https://docs.fedoraproject.org/en-US/Fedora_Core/3/html/Software_Management_Guide/sn-yum-proxy-server.html