This post is a quick start manual for beginners to use Git with Auzre DevOps to source code control. Although this manual aims for the operations with Repos of Azure DevOps, the instructions apply to general Git practices. This post assumes that you have already set up a Azure DevOps account where you can restore your source code and manage the development.
Table of Content
- Table of Content
Download and Install Git for Windows
The following instructions are for installing Git on Windows. If you need to install Git for other operating systems, please follow instructions Installing Git.
Go to https://git-scm.com/download/win, and the download will start automatically. If the download doesn’t start automatically, you can manually click the download links.
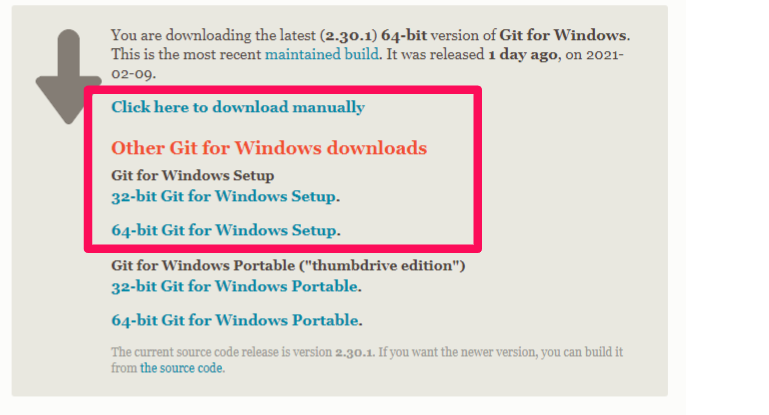
When the download finishes, you will get an .exe file, and you can double-click it to install. You can keep all default settings during installation.
Configure Git for the First Time
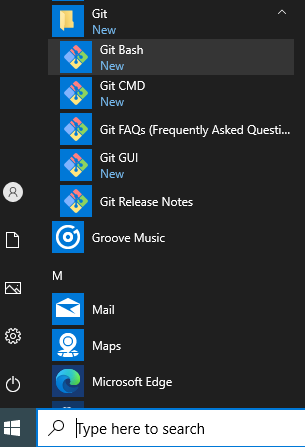
After installation of Git on your Windows system, you can start Git Bash from the Start Menu:
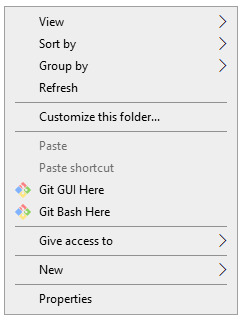
You can also start Git Bash from the Context Menu through right-clicking from any local directory:
Once you start your Git Bash for the first time, it is a good idea to customize your Git environment by running the following commands. Note, the setting commands only need to do one time.
git config --global user.email "you@example.com"
git config --global user.name "Your Name"
You can check all your settings through running:
git config --list
On Windows systems, this command looks for the file .gitconfig from your $HOME directory, which usually is C:\Users\$USER.
Clone a Code Repository from Azure DevOps
You can get a copy of a remote repository on Azure DevOps through the git clone command. Click on the Clone button in the upper-right corner of your repository, you can get the tab shown as the following picture. There are two ways to connect to the remote repository: HTTPS and SSH.
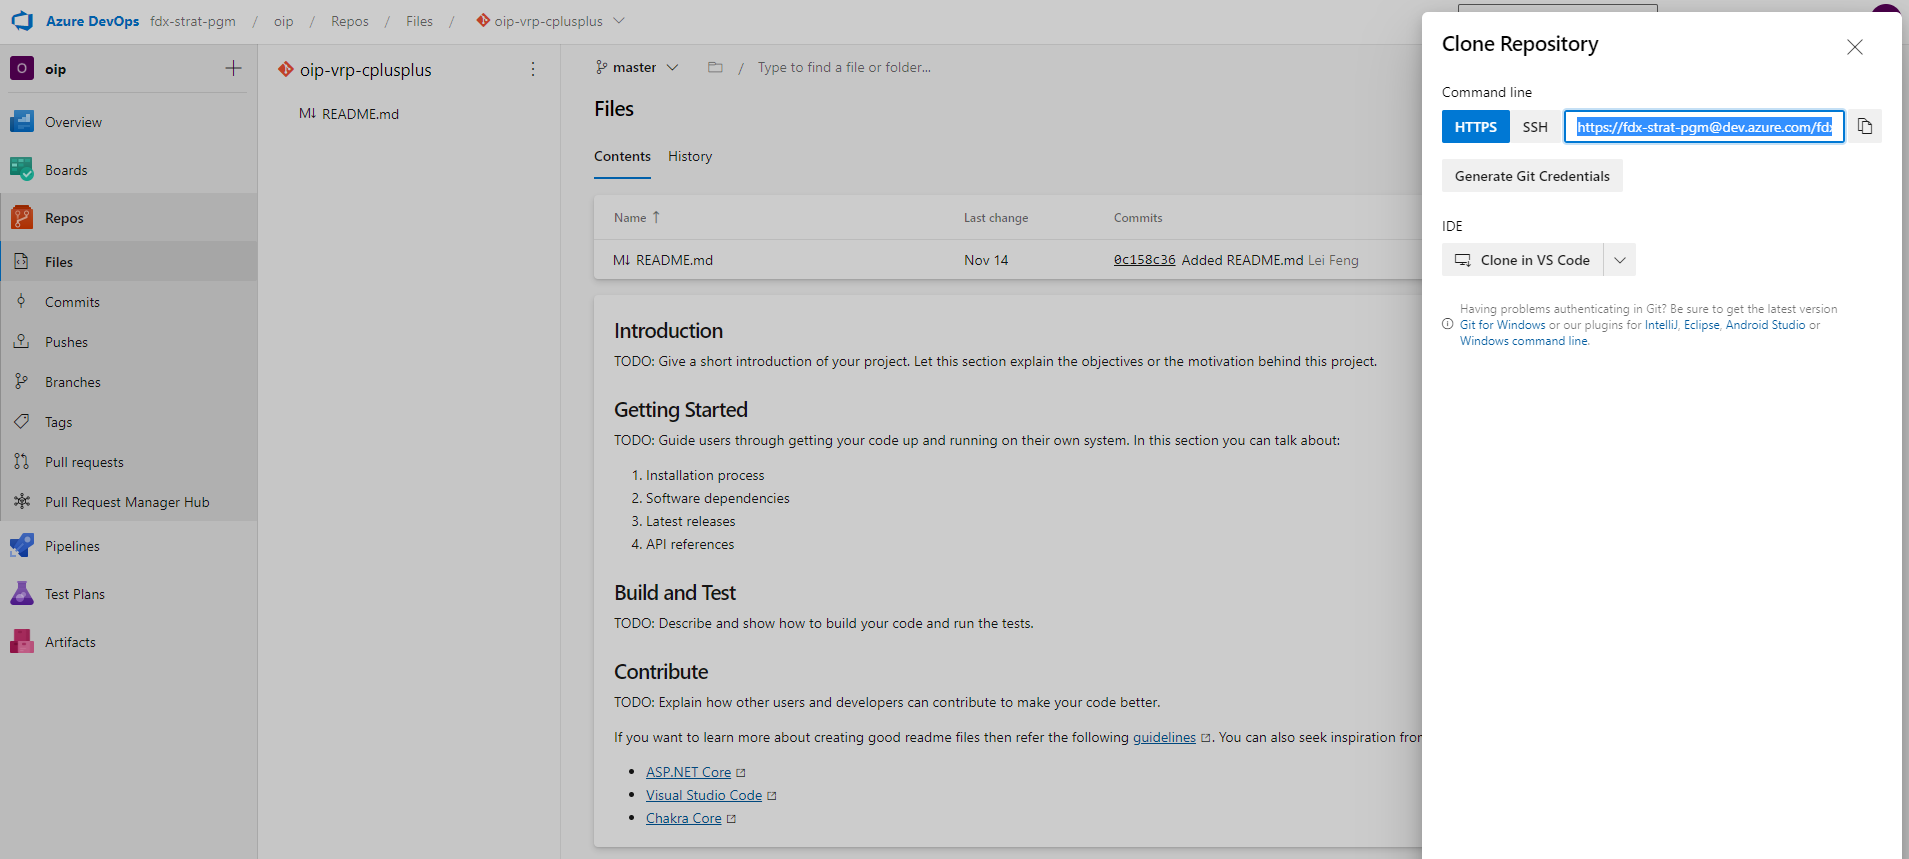
Clone with HTTPS
You can copy the URL to the HTTPS and run the following command to clone a remote repository to your local directory. The command would prompt a message asking for the username and password to the remote Azure DevOps repository.
git clone <URL_HTTPS>
This is not recommended way to connect to the repo, while clone with SSH described below is securer and more convenient way to do so.
Clone with SSH
To clone with an SSH connection, you need to follow the instructions below to set up SSH Key in your Azure DevOps settings.
Generate a SSH Key Pair
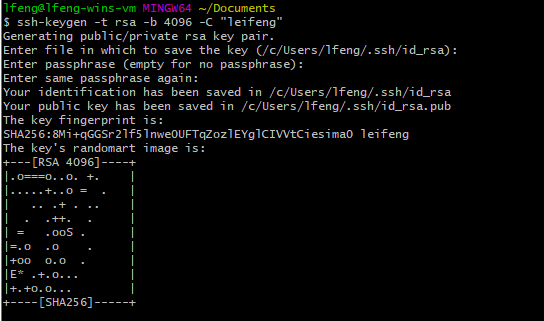
You can create a new SSH key pair by running the following command in the Git Bash or PowerShell. You can use the default key file name and empty passphrase. This command generates two files with names of ado_rsa and ado_rsa.pub under the path of C:\Users\$USER\.ssh\.
Note: if your git bash does not work correctly, you can run the same command through PowerShell if you are using Windows.
ssh-keygen -t rsa -b 4096 -C "<USERNAME>" -f $HOME/.ssh/ado_rsa
Configure SSH in SSH Agent
Run the following commands
eval `ssh-agent -s`
ssh-add ~/.ssh/ado_rsa
Add the following settings into ~/.ssh/config file:
# my company gitlab production environment
Host *
  PreferredAuthentications publickey
  AddKeysToAgent yes
  IdentityFile ~/.ssh/ado_rsa
Generate a new one if it doesn’t exist yet.
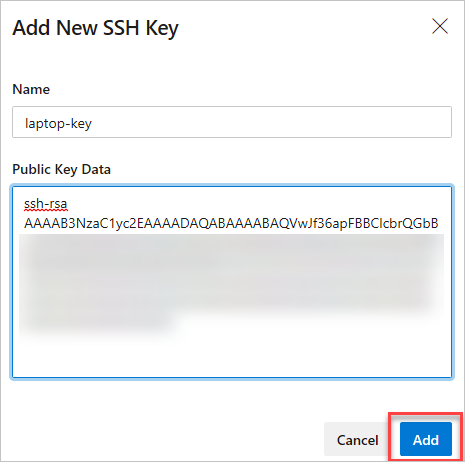
Add the Public Key Azure DevOps Settings
Once you get the SSH key pair, set up the SSH public key through the following steps:
- Log into Azuer DevOps, click User settings icon in the upper-right corner of the page
- Select SSH Public Keys from the dropdown list
- Click + New Key button in the upper-right corner of the page
- Copy the content from generated
ado_rsa.puband paste it in the Public Key Data box and give the key an informative name for future management - Click Add, you will get an email notifying you added a key to your profile.
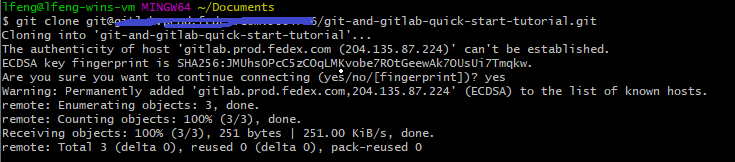
Clone with SSH Command
Once you set up your SSH key in your GitLab profile, you can run the following command with the corresponding SSH URL to clone the remote repository without inputting your username and password.
git clone <URL_SSH>
Once you clone the remote repository to local successfully, you can navigate to the directory through cd <REPOSITORY_NAME>:

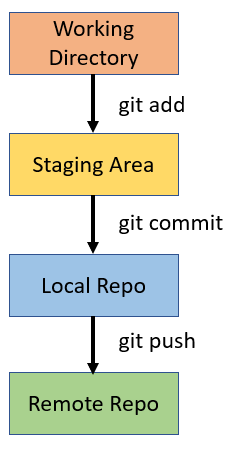
Now, you are inside your working directory, and you can make any changes you like. Once you are happy with the changes, you can add and commit them to the local repository and then push to the remote repository so that your fellow team members can see the changes you made.
Please note that you are in the default master branch and all the changes you made are within this branch. And when you push the changes to the remote repo, it will update the master branch there. Usually, this is not the best practice.
Best Practices for Code Review
Excellent code depends on rigorous review. The following flow might be the best practices for code review and team collaboration:
-
Once checks out a repository, a developer creates a new feature branch, makes changes in this feature branch, and tests it.
-
When happy on the changes, the developer pushes the changes in the new branch, and make a merge request.
-
The developer assigns the merge request to a reviewer, who looks at it and makes comments as appropriate. When the reviewer finish, he/she can assign it back to the author.
-
The author addresses the comments. This stage can go around for a while, but once both reviewer and author are happy, they can approve a merge or assign it to a final reviewer who can do the merge.
-
The final reviewer follows the same reviewing process again. The author again addresses any comments. Once the final reviewer is happy and the build is green, then the new branch will be merged with the target branch.
Pull from Remote
Before you make any changes, it is always a good idea to run the command git pull to make sure your current local repository is up to date.

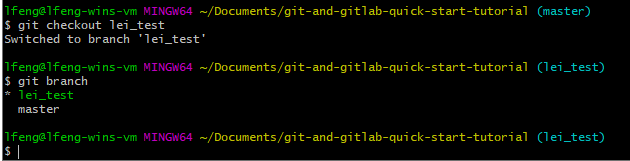
Create a New Branch
Branches let you work on new features or bug fixes of the main project code in the master branch. You can use git branch <BRANCH_NAME> to create a new branch and git branch to check your branches.

Note the asterisk next to the master, which indicates that you are currently in the master branch. To switch to your new branch, you need to run git checkout <BRANCH_NAME>.
Commit Local Changes
Now, you are in the new feature branch and ready to change your codes.
git status
Once you finish your changes, you can run git staus to check the changes you have made.
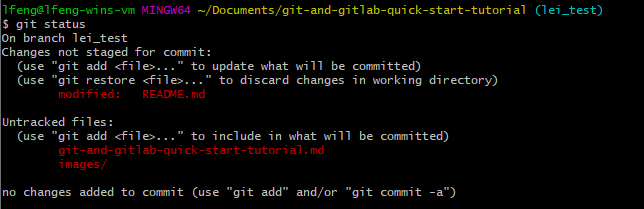
git add
You can run the command git add <FILE_NAME> (add the specific file) or git add . (add all files) to add your changes to the staging area. A staging area is an intermediate place between your working directory and local Git repo where any changes that you’ve made can be reviewed before you actually commit them to the repo.

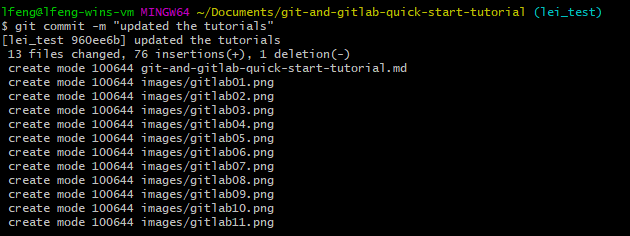
git commit
Next, you can commit the changes to your local repo through running git commit -m "MESSAGE_TEXT".
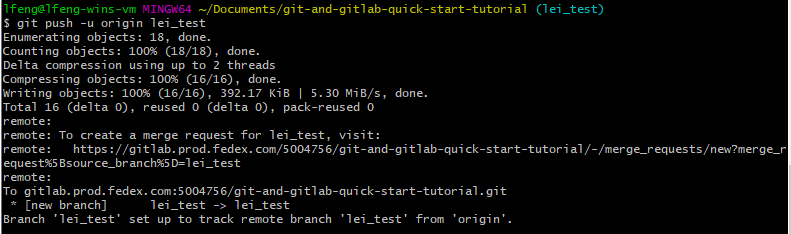
git push
After committing to the local repo, you can push the commits from the local to the new branch in the remote repo through running git push -u origin <BRANCH_NAME>.
merge request
Once you push the local to the new branch in the remote repository, you can submit a pull request through Create a pull request button on the remote repository page.
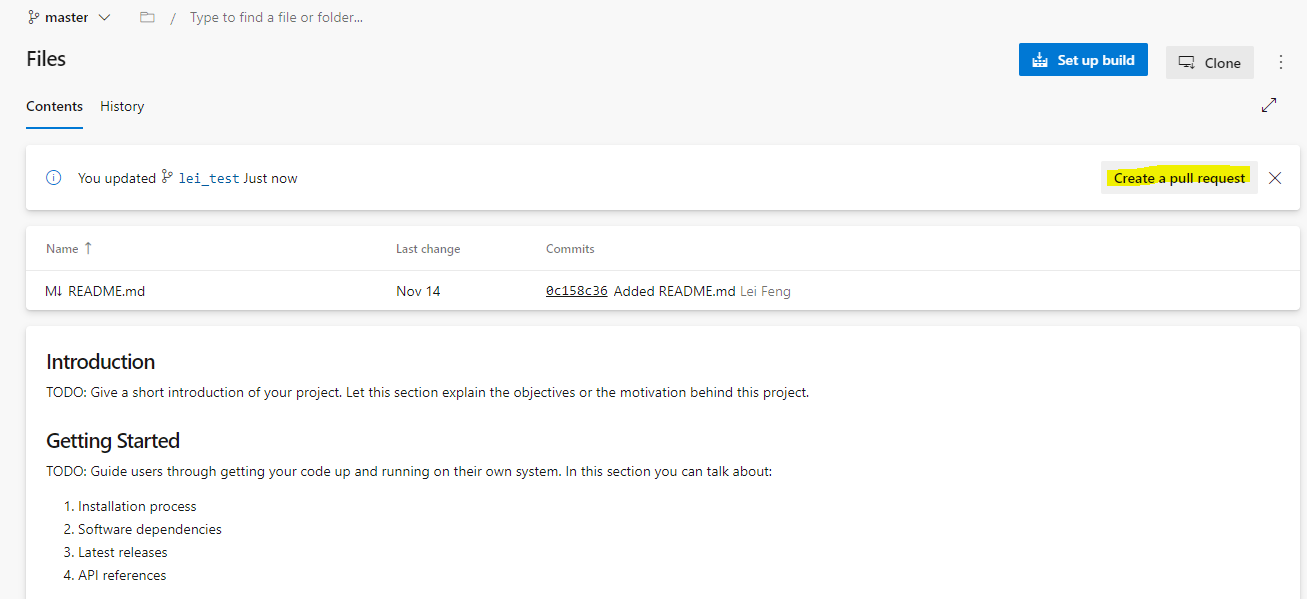
The Create a pull request button will pop up the New pull request page, where you can:
- fill the title of the request;
- write a brief description;
- assign reviewer(s) from the drop down list;
- link work item(s) from the drop down list;
- add tags and labels.

Once the merge request has been submitted, the reviewer(s) will get notification and they can go the request page to do:
- check the commits and changes;
- write comments;
- approve the merge (if applicable);
- close the merge request (if applicable).
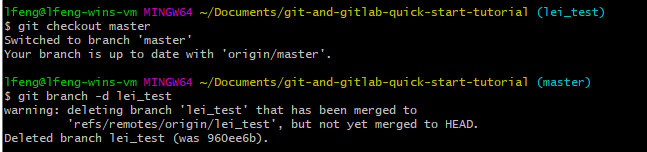
delete local branch
Once your new branch has been merged to the target branch in the remote repository, you can delete your local branch by running git branch delete -d <BRANCH_NAME>. Note, you have to get out of the branch before you run this command deleting it.
pull from remote
Now, it will be a good practice to run git pull again to synchronize your remote repository to your local.
I hope this quick-start tutorial is helpful to you. Please feel free to leave any comments and advice. Thanks for reading.
References
- https://git-scm.com/book/en/v2
- Auzre DevOps - Use SSH Key Authentication