As a power user of Google Cloud Platform, you definately need to use gcloud, gsutil and bq commands to work with GCP, which means you need to install Google Cloud SDK on your local computer. You can install the Cloud SDK through many options, including versioned archives, installer, apt-get/yum for Linux distro, and even Docker image. This post describes the process of installing the Cloud SDK through versioned archive on operating systems that have already installed Python through Anaconda. The process has been tested on both Windows 10 and Ubuntu 18.04.
Installing through versioned archives might be the best way for non-interactive installation of a specific version of the Cloud SDK. Each of the versioned archive has a self-contained Cloud SDK packages in a directory that can be copied to any location on your file system. Thus it doesn’t need to run any installer on your system.
Google Cloud SDK needs Python, however, its bundled Python package is still 2.7 and most of the Cloud SDK components already switch to Python 3 since version 274.0.0. In order to use an existing Python on your systems, especially, the Python is managed by Anaconda, you might need to follow the process described in this post to make things work.
1. Install Python
If you are still using Python2, I highly recommend you to change to Python3 now. If you have not used Anaconda yet, I also highly recommend you to try it out. You can follow this post to install and quick-start Anaconda.
2. Set up CLOUDSDK_PYTHON Environmental Variable
- If you are using Windows, add the following variables to your Environmental Variables:
- Variable name:
CLOUDSDK_PYTHON - Variable value:
path\to\anaconda3\python.exe
- Variable name:
- If you are using Linux or macOS, add the following line to the
.bashrcfile.
export CLOUDSDK_PYTHON="/path/to/anaconda3/bin/python"
and don’t froget to run source .bashrc to refressh your change.
3. Download and Install Google Cloud SDK
- Download the appropriate versioned archive compatible with your system from the download page.
- Extract the contents of the file to any location on your file system.
- Add the Cloud SDK
binfolder to your PATH environment:- On Windows:
- run the command
.\google-cloud-sdk\install.bator - manually add
path\to\google-cloud-sdk\binto thePATHenvironmental variable.
- run the command
- On Linux or macOS:
- run the command
./google-cloud-sdk/install.shor - manually add
export PATH="/path/to/google-cloud-sdk/bin:$PATH"to.bashrc
- run the command
- On Windows:
4. Potential Error
After finishing above three steps, you run gcloud --help to make sure everything works. You might see the error message as shown below:
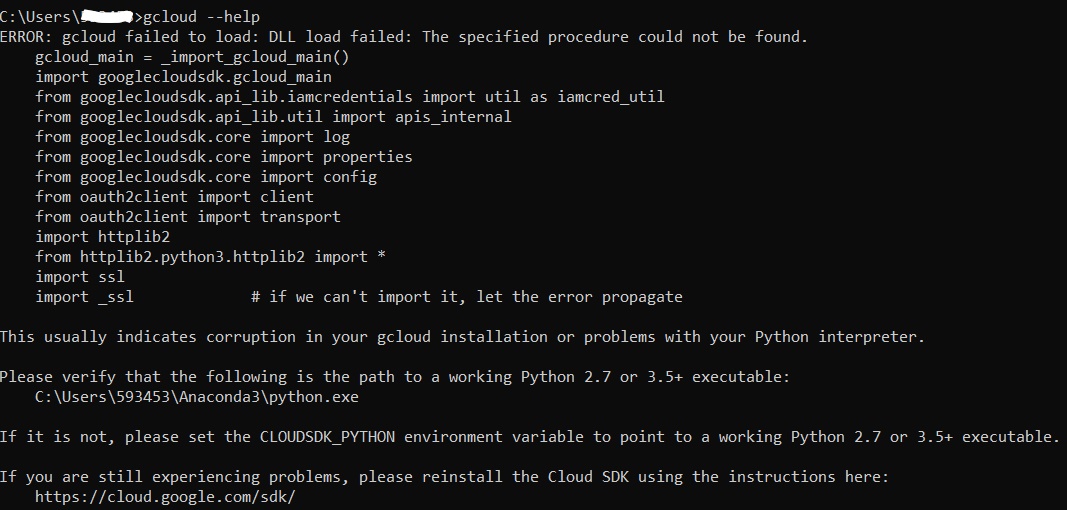
This is causes by the Anaconda environment initialization. You need to run activate base to activate your base environment before run the gcloud commands.
5. Setup and Manage SDK
Initializing SDK
With a fresh installation of SDK, the first step is typically to run the gcloud init command to authorize access to GCP project and create a new configuration with a set of base setings.
If required, you can use the following command to prevent the command from lauching a browser-based authorization flow:
gcloud init --console-only
The gcloud init command usually creates a new configuration with the name of default. Please note that there is nothing special about the intitial default configuration and you can name it with whatever name you want.
You can use the gcloud config set command to set the properties of this configuration. For example:
gcloud config set project myProject   # set project to myProject
gcloud config set compute/zone us-west2-b  # set zone to us-west2-b
Authorizing SDK
If you just need to authorize with a user account without setting up a configuration, you can run:
gcloud auth login
If you need to authorize with a service account instead of a user account, you can run:
gcloud auth activate-service-account
Managing Configurations
If you are using multiple projects with multiple authorization accounts, you would like to create multiple configurations - one for each project.
You can use the following command to create a configuration:
gcloud config configurations create [CONFIGURATION_NAME]
You can use the following command to activate a configuration:
gcloud config configurations activate [CONFIGURATION_NAME]
You can use the following command to list all configurations:
gcloud config configurations list
You can use the following command to delete a configruation:
gcloud config configurations delete [CONFIGURATION_NAME]
You can use the following command to check properties of a configuration:
gcloud config list
gcloud config list --configuration=[CONFIGURATION_NAME]
You can use the following command to set properties of a configuration:
gcloud config set compute/zone us-west2-a
gcloud config set compute/zone us-west2-a --configuration=[CONFIGURATION_NAME]
Managing Components
The default components of the Cloud SDK are gcloud, bq, gsutil and core.
You can use the following command to check the components installed:
gcloud components list
If you want to install additional component you can run the following command:
gcloud components install [COMPONENT_ID]
You can run the following command to make sure that all components of the SDK are up to date:
glcoud components update
and run the following command to install the beta components:
gcloud components install beta